A Review Of wiring a pendant light
Just how do you actually feel in relation to wiring a pendant light?You'll commonly see us describe 2-wire and also 3-wire lighting systems. This is a vital factor as several products, such as relays, can not work if installed right into a 2-wire system.
This application note clarifies the difference in between 2-wire as well as 3-wire lights systems and helps you understand which variation you have in your installment.
To start with, what do we suggest by 2-wire and 3-wire systems. The simple explanation is that a 2-wire system does not consist of a Neutral wire at the light switch, the 3-wire system does include the Neutral at the button.
2-wire Lighting Equipments
This is one of the most common lights system in Europe, almost all homes utilize this system, especially in the UK as well as Nordic regions.
The term is slightly complicated as the system will in fact include 3 cables. However, the 3rd cord, which typically has a green/yellow sleeve is the Planet cable. The Planet is a very important part of the electrical system and all switches, home appliances as well as lights should be appropriately earthed. But for the sake of simpleness we ignore the Earth cable when explaining electrical wiring as it plays no energetic role in the daily operations of your light circuits.

3-wire Lights Equipments
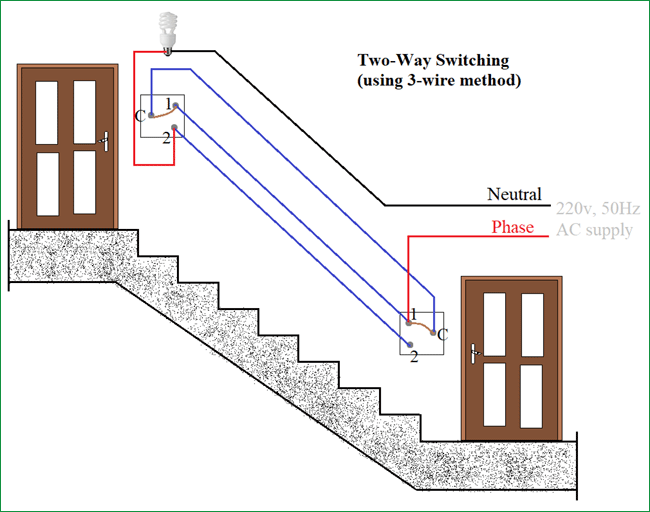
The 3-wire system is much less common than the 2-wire system, it includes a Neutral at the button along with the Live as well as Switched Live wires.
An example of a 3-wire lighting circuit is shown in Number 2. One '2-Core + Earth' cable television takes Live and Neutral to the button back box, a 2nd cable television takes the Neutral and also Switched Live to the light.
Keep in mind - the Neutral is not attached to the actual switch, both Neutrals are attached together using a port block.
Exactly how do I understand which system I have?
As the 2-wire system is the most common, it's possibly best to begin with the assumption that you have a 2-wire system, particularly if you remain in the UK or if your residence is greater than 3-5 years old.
You can examine the adhering to points:
• Are all the cables connected to the button?
• Do all the cables have a brownish sleeve on them?
• If the answer is YES to either of these factors, you have a 2-wire system
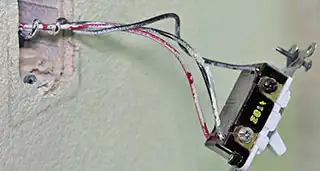
• Do you have two blue, black or grey cords mosting likely to a port block? If so you MAY have a 3-wire system, but you should validate this with a voltage meter or get in touch with a qualified electrical contractor.
A Word of Caution
Turn off the breaker managing the light as well as follower circuit. This is the single crucial part of any home electrical wiring treatment. Even after switching off the breaker, it's still a great idea to use a voltage tester to evaluate the wire links prior to you work on them.
You'll Require to Make Pigtails
In electrical work, a pigtail is a collection of wires interlaced along with a short size of cable. The pigtail enables you to attach all the wires to a solitary terminal. The secret to making an effective one is to turn the wires together clockwise-- not counterclockwise-- prior to screwing on the cap. In this way, the clockwise strings of the cap make the link tighter when you screw it on.
Converting From Two Buttons in the Exact Same Box to One Switch Over
Disconnect the two black wires from both switches. If you do not know which one materials power to each switch, transform the power back on and test the wires by connecting each to ground with your voltage tester. The live circuit cords will provide you a reading and also the others won't. Transform the breaker withdraw when you understand which is which.
Make a pigtail with the two live wires and a brief length of black cord of the very same gauge. Connect the brief wire to the leading terminal of the switch you wish to use. Do the same with both other wires, and also connect them to the bottom terminal of the switch.
Loosen the cap from the two white cables serving the switch you're no longer making use of, add a brief length of white cable of the same scale and also screw the cap back on make a pigtail. You might need a bigger cap than the one that got on there. Interlace the various other end of the brief cable to both white cables offering the brand-new button. If you want, you can likewise simply splice all four white wires with each other under the exact same cap, yet you might locate that challenging to do with four cords.
Get rid of the ground from the out-of-service switch and the one from the button you're making use of. Attach them by turning them together or making use of a crimp ring, then affix them to the eco-friendly ground terminal on the switch you're making use of.
Attaching a Light as well as Follower to a New Switch
Locate the switch wire, which must be sticking through the top or side of package see page serving the fan or light. Using cable pole dancers, strip an inch of insulation from the end of the black and white cords. Mate the black wire from the fan along with the black cable from the light as well as the black wire from the button, and cap them. Link the white cords together in the same way, then repeat with the ground cables. When you splice ground cords, you do not need to cover them, but it's still a good suggestion to do so due to the fact that the cap assists keep them together. Mount the fan and light and move to the button box.
Connect the black wire from the fan down terminal of the button and also the real-time circuit wire to the top terminal. Mate the white cables with each other and also cover them. Spin the ground cables together as well as connect them to the green ground screw on the button.
As an avid person who reads about install ceiling light, I think sharing that section was really useful. Do you know another individual who is in to the topic? Be sure promote it. Many thanks for taking the time to read it.
This eaten Power is mirrored by the amount of watts which are applied Every hour by each and every appliance you utilize in your house. This is often often called kilowatt-hrs or kWh.
So, for making that dilemma disappear, how about wiring the enthusiast and light individually. Certainly, it’s feasible to do so when you are dealing with the installation. Allow’s find out today the best way to wire ceiling enthusiast and light separately.
You are going to now really need to transfer your wires to 1 aspect in the electrical box. From here you can mount the crossbar into the electrical box.
In case you have linked to the change cable, the circuit tester will reveal you have completed a circuit. If not , it will likely not shift and you check out the next list of brown and blue wires which are inside of a cable jointly.
Then attach the ground wire to your bare floor wire from your own home. Make use of a wire nut to secure them with each other. To appropriately join many of the wires, twist The 2 wire together clockwise. And screw a wire nut on restricted right up until the wires begin to twist.
Generally, light fixtures function distinct colour wires that match the wires inside the electrical box while in the ceiling. This makes replacing an present fixture with a different just one reasonably easy–right until you realize your fixture has two black wires.
On the lookout for one thing specifically? I’ve been blogging due to the fact 2013 and there's a number of information concealed back again below!
Very like light bulbs, light sockets can burn off out or malfunction due to wear and tear or corrosion with the metallic.
Electric power moves alongside the Reside wire. This really is the way it feeds what is needed. From this level, it goes back again for the neutral wire to its nearby transformer.
Take away the mounting screws and gently pull the socket absent, exposing the fixture wires and their terminal screws.
Do not forget that we had earlier said that two with the wires are named scorching wires because they are those that keep the electric demand. The last list of wires to become related are the hot wires.
I happen to be searching for a new light for more than my kitchen sink and I really like yours! Testing their site at this time.
The next quit is The buyer unit. It can be from this resource which the electrical energy is distributed about your house. Within this box, you should have circuits.
If you are sure the distant is charged As well as in vary, then the distant will be the concern, so you’ll want to examine this. To unravel the frequency mismatch problem: